A New Twist On A Classic Roast
Ingredients
2-4 bone rib roast
Coarse Salt [3 tbsp]
Coarse Black Pepper [3 tbsp]
Rosemary [6-8 sprigs]
Unsalted Butter [1 stick]
Fresh Garlic [3-6 cloves]
Lemon [1]
Spicy Mustard [2oz]
Prep: Overnight
Cook: 4-5 Hours
Total: 6 Hours
Servings: 2-4
Yield: 4 servings
An open-fired take on a classic holiday beef dish, Fired Rib Roast.
Though it can look intimidating, open-fire cooking is just understanding the basics. In my opinion, it's hard to beat any beef-based dish that’s cooked over an open flame. This cook requires very little prep and common household culinary tools to cook.
Let's start with the star of the dish, the standing rib roast. For this cook, I selected a 2-bone roast, which is adequate for feeding 2-4 adults with 1/4 to 1/2 inch thick slices. For larger groups/families I suggest at least a 4-bone roast.
When choosing a roast there are a few things to look for, a nice even fat cap is great. It helps protect the meat from the flames, I also look for good marbling on the roast. Marbling is important as it helps impart flavor to the roast, along with helping with tenderness. If unsure which roast is best, ask your local butcher to help with the selection, some will even separate the bones for you. Make sure not to toss the bones though, they will have great flavor by the end of the cook, and make a wonderful snack.
Preparation
Now that the rib roast is selected, it's time to do a dry brine. With such a thick piece of meat, it's best to impart as much flavor as possible early on, and dry brining is a simple way to do just that. Pat dry the rib roast and salt generously and evenly on all sides, then place the roast on a rack with a tray underneath to catch the excess moisture. Let the roast sit refrigerated and uncovered overnight.
Prior to completing the seasoning process, build a nice bed of coals in your grill. Tho it is open fire style cooking, a roaring flame is not going to be needed for the whole cook. A nice bed of coals giving consistent and manageable heat will work best. However, do keep in mind flare-ups will happen as the fat renders and drips onto the coals.
Remove the roast from the fridge, rinse off the excess salt and pat the roast dry its time to continue the seasoning process. Using a binder, in this case, course spicy mustard. Evenly coat the rib roast with mustard, since a coarse binder is being used there will be hints of it left during the cook and that is what we want. The most flavorful bites from start to finish. Next, grab your favorite beef rub, I am using American Prime from Philips Barbeque Co, you can use regular salt and coarse black pepper if you like. Ground black pepper doesn’t do well with cooks like this. I like to let the seasoning set for 5-10 minutes then apply another round of black pepper, this helps build a great crust/bark.
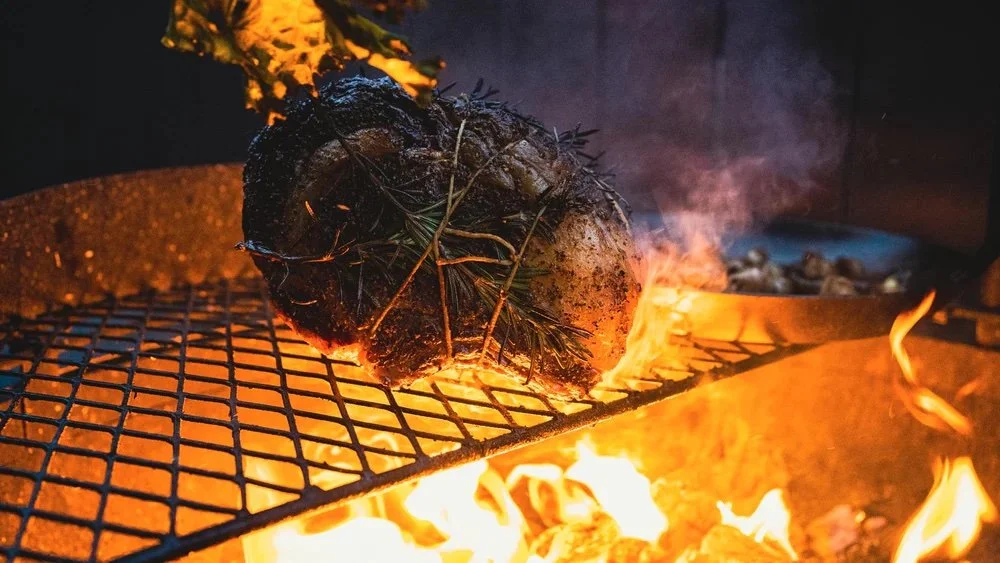
Lastly, it's time to tie the roast together. If you had the bones removed, now is the time to place them back. You can make flavor pockets by adding some fresh rosemary and garlic to the base of the bone and then placing the roast on top to tie it all together. Personally, I add additional rosemary to the exterior of the roast, it's great for flavor but also helps as a heat indicator during the cooking process.
Now that everything is tied and ready to be suspended, it’s time to head to the grill. Hook your rib roast and allow it to hang roughly 1 to 1.5 feet from the bed of coals. If using a traditional grilling method set up two-zone cooking with the majority of your heat pushed to one side and the roast sitting on the portion without coals underneath.
From here on it's a lesson in patience as the fat renders and drips, and you start to smell the oils from the fresh rosemary. This style of cooking is great for large or intimate gatherings during the holidays as everyone can partake. From melting down the butter to confit the garlic for basting. Down to adding small splits of wet and dry wood to add smoke and heat for the cook.
As the rib roast is cooking use this time and flame to prepare some of your sides. I personally like to catch some of the rendered beef drippings in a cast iron pan and use that along with a little butter to sauté mushrooms. For this cook, I have hung some lettuce above the fire for a nice smoked salad. Get creative with your sides and how you cook them when using an open fire.
Remember we want to add flavor at every phase, in a small skillet or pot add 1 stick of butter, 3 large cloves of garlic, and juice of 1 lemon and craft a rosemary herb brush. Set the skillet near the flame so all the butter can melt and the garlic can begin to release its oils. Then use the herb brush to baste the rib roast. You can remove it from the hook and set it right above the coals. Heads up flare-ups are bound to occur at this phase, to avoid burns make sure to use heat-resistant gloves.
Use a meat thermometer throughout the cook to monitor your doneness levels, you can cook to your desired level. Just keep in mind the carry-over heat, which is the heat left within the beef that allows it to continue to cook even when removed from the heat source. I typically like to pull 5° sooner than my desired internal temperature. This lowers the chances of the beef getting overcooked.
